Monday, November 14, 2011
Wednesday, November 9, 2011
Tuesday, November 8, 2011
Monday, November 7, 2011
Bank Reconciliation in Dynamics GP - Getting Started
The Bank Reconciliation module in GP is very simple. Like most things, the basics are straight forward but the devil, as they say, is in the details.
To get started you need to setup a checkbook. Checkbook is GP’s term for a bank account. The Checkbook is linked to a unique GL account and should be used anywhere that bank account and therefor the GL account needs to be used. I will get into more details about setting up the Checkbook in a video post later.
If you have to create a Checkbook for a new bank account just as you open the bank account, it would be simple. You can setup all the required information and start off with a zero balance. Your first deposit would be your first transaction and you simply recreate every activity that happens against your bank account against the checkbook going forward. In this scenario, the first slightly complicated step would be when you do your first bank reconciliation, typically at the end of the first period.
But in most real life scenario’s, you are probably looking to setup a checkbook for an existing bank account. And that is where things get a little complicated. But if we breakdown the individual components we need, then you will realize that it is not as complicated as it might first appear.
There are only two things you need to set up a checkbook for an existing bank account. We are assuming here that you are not concerned with the historical activity on the bank account.
1. Bank statement ending balance. You should always start with the ending balance from a bank statement. Obviously, this means that you don’t want to start reconciliation in the middle of a period.
2. List of outstanding transactions. These are the transactions that have posted to your financial books but have not yet cleared the bank.
If you add/subtract all the outstanding transactions to the statement balance, you should have the account balance of the GL account that is associated to the Checkbook.
We will explore and demonstrate the various aspects of the Bank Reconciliation module in GP with video posts on the following sub topics.
· Setting up a Checkbook
· Different types of Bank Transactions & Transfers
· Bank Deposits
· Bank Reconciliation process
Thursday, November 3, 2011
Using IM to Import AP Transactions (Advanced ODBC)
Today, in part two of our AP integrations through IM, I will show you how just using one feature of IM (Advanced ODBC), we can avoid a lot of manual work and make the process a lot simpler and faster.
SQL Code Used in Header:
SELECT BatchID, VendorID, DocumentDate, Description, sum(distributionamount) as amount, left(ExpenseAccount, 3) +'-'+ BatchID+'-'+left(VendorID,8) as DocNumfrom AP2.csv
group by BatchID, VendorID, DocumentDate, Description,left(ExpenseAccount, 3) +'-'+ BatchID+'-'+left(VendorID,8)SELECT BatchID, VendorID, DocumentDate, Description, sum(distributionamount) as amount, left(ExpenseAccount, 3) +'-'+ BatchID+'-'+left(VendorID,8) as DocNumfrom AP2.csv
order by left(ExpenseAccount, 3) +'-'+ BatchID+'-'+left(VendorID,8)
SQL Code Used in Detail:
select DocNum, Amount, ExpenseAccount,DistributionType, DistributionReference
from
(select left(ExpenseAccount, 3) +'-'+ BatchID+'-'+left(VendorID,8) as DocNum, distributionamount as amount, expenseaccount, '6' as distributiontype, distributionreference
from ap2.csv
union all
select left(expenseaccount,3)+'-'+BatchID+'-'+left(VendorID,8), -sum(distributionamount), left(expenseaccount, 3)+'-2000-00', '2', ''
from ap2.csv
group by left(ExpenseAccount, 3) +'-'+ BatchID+'-'+left(VendorID,8),left(expenseaccount, 3)+'-2000-00') GAPD
order by DocNum by left(ExpenseAccount, 3) +'-'+ BatchID+'-'+left(VendorID,8)
Wednesday, November 2, 2011
Using IM to import AP Transactions (Simple Method)
A lot of times, we get expense reports and credit card statement files that need to be entered in GP as payables transactions. Integration Manager is a great tool to do this. There are several ways that we can accomplish this. I would like to share a couple of them.
Since writing out the instructions for this would take several pages and one of the rules I have setup for myself is not to have posts that are too long, I am going to venture into my first video blog post today.
Since writing out the instructions for this would take several pages and one of the rules I have setup for myself is not to have posts that are too long, I am going to venture into my first video blog post today.
This video explains in detail a simple way to use IM to import AP transactions. All the information needed is passed from the files. No additional features of IM are used. This method is labor intensive but requires less technical expertise.
Tuesday, November 1, 2011
Things to know before installing a new GP client
Every once in a while I have to install a GP client in a new workstation. This is the kind of customer who has a very simple setup and I don’t hear from for a while. That means I don’t know much about their GP environment, including their version, the products that are being used and if they have any customized forms or reports. In such a situation, this is what I usually do.
Before starting the new client install, I will log onto another workstation where GP is installed and working properly with all the modules and reports. Once logged on, here are the things I will make note of.
GP Version. GP makes it very easy to find out the version information. Just launch GP and on the very first screen where we put in our username and password, we can see the version of GP. Once I find out the version number, I know if I need to apply any service packs. The next step here is to locate the service pack executable somewhere on a network drive or log onto PartnerSource to download the service pack.

Other GP Products. To find out the other GP modules that have been installed, I go to Control Panel >> Add Remove Programs (or Programs and Features) and click on Microsoft Dynamics GP (9.0 or 10.0 or 2010) and then click on the Change button.

On the window that opens, I would click on Add/Remove Features.

On the next window, I would scroll through the window on the left and make note of every product that DOES NOT have a red X mark against it. These are the GP products that have been installed on this workstation.

Modified Reports & Forms. To see if there are any modified forms or dictionaries, I would log into GP and go to Tools >> Customize >> Customization Maintenance.

If I see any forms or reports listed, I make a note of all the products (last column) and whether reports or forms have been modified (2nd column). I will then need to know the location of the reports and forms dictionaries. To find out this location, I would go to Tools >> Setup >> System >> Edit Launch File. Once here I make a note of the location of the necessary dictionaries from each product I made note of on the Customization Maintenance window.

Obviously, we have not addressed any 3rd party products or customizations. You can start to get an idea about them by looking into the Dynamics.SET file. But that is beyond the scope of this post J.
You can follow any installation documentation to do the GP client install but you will notice that you now have enough information to answer any questions you will have to complete the installation instructions.
Once you have completed the install and logged into GP, you should go back to the Edit Launch File window (last screenshot) and set the paths same as the workstation that you took notes from.
Monday, October 31, 2011
Automatic Vendor Numbers in GP
GP does not have the ability to create automatic vendor numbers on an incremental basis. But there is a simple workaround where you can automatically create vendor numbers. We will need to use the “Next Temp. Vendor ID” setup in the Payables Setup Options window. Obviously, if you do create temporary vendors, then you will not be able to use this workaround. Alternatively, if you have security restrictions where the user who can create vendors not being able to create and vice versa, you will not be able to use this workaround. If you that level of security, then you would have to look into 3rd party products or some sort of customization.
To setup the Vendor Number format that you want to use, you would go to the “Payable Setup Options” window by going to Tools >> Setup >> Purchasing >> Payables and then clicking on the “Options” button on the “Payables Management Setup” window. On this window, setup the Vendor number sequence you want to start with. For example, you could start with V000001 so that your vendor numbers are V000001, V000002 and so on.

Creating temporary vendors is done through the following AP transaction windows (Payables Transaction Entry window, the Payables Manual Payment Entry window, and the Edit Payables Checks window). For our example we will use the Payables Transaction Entry window.

On the Payables Transaction Entry window, with the focus on the Vendor ID field, hit Ctrl+T (or you can drop down on the Options menu and select Temporary Vendor).
This should open the Vendor Maintenance window with the next vendor number populated. Be sure to change the status to “Active” before adding additional vendor information and closing the window.

If you have already have vendors setup with different vendor numbers, you will have to change the vendor numbers. You can do this using the PSTL tool. But that is for another post!
Thursday, October 27, 2011
How to fully depreciate an asset in the next depreciation run?
Let’s say you (or your boss) wants to depreciate a particular asset completely in the next depreciation run, this is what you will need to do. This is only if the asset is not being retired but will remain on the books.
The key is to change the Original Life of the asset so that the Remaining Life becomes equal to the number of days for the month you will be depreciating. And when you save this new Original Life, you will need to choose “Recalculate” as the depreciation recalculation method. We do this because we do not want to change any historical depreciation information.
Once you update the original life for the asset(s), all other steps are the same as usual.
Let’s walk through an example to illustrate this scenario and the solution better. The first screenshot you see below gives you the state of the Asset Book before any changes are done. The asset has been depreciated through 09/30/2011, the remaining life is 3 years and 22 days, and the net book value is $58,000.00.

We need to update the remaining life to 31 days, since the next depreciation period is October. Because we cannot directly change the remaining life, we need to update the original life so that we get the remaining life we want.
If we subtract the Remaining Life from the Original Life, we get the total life of the asset so far – which is 1 year and 138 days. For the new remaining life to be 31 days, we need to add 31 days to that number. So when we plug 1 year and 169 days into the original life, our remaining life now says 31 days, which is exactly what we want.

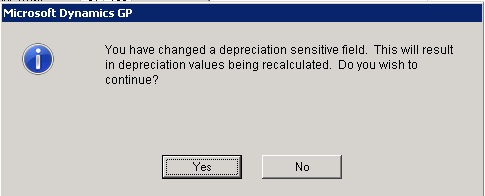
Since you have changed a depreciation sensitive field, the system will need to recalculate the depreciation. So click “Yes” on the pop up window.
If you do not want to change any historical depreciation information, you will select “Recalculate” here.

Now, you can depreciate the asset as you would normally do. Here are the results. You can see that the current depreciation amount is $58,000, the fully depreciated flag is set to Y, and the remaining life is 0.

Wednesday, October 26, 2011
Running the FRx AA Wizard in a 64 bit Machine
Microsoft does not support FRx on a 64 bit machine. That is not to say that FRx does not work on a 64 bit machine. I have seen instances where FRx works just fine on a 64 bit machine. But here is an instance where you will not be able to use a 64 bit machine.
If you are setting up FRx to report on Analytical Accounting information, you will need to go through a process of defining the AA dimensions in FRx. The Analytical Accounting Dimension Wizard which can be found in the Analytical Accounting folder within the FRx folder is used to add the AA dimensions to FRx.
On the first step you will be asked to specify the ODBC Datasource, System Database, Login and Password.

As soon as you move focus to the Company dropdown, you will get this error message.
“An internal program error has occurred. The program is shutting down.”

This will only happen on a 64 bit machine. The only workaround is to run this process from a 32 bit machine. However, once you have created the dimensions in FRX using this process, you can use the 64 but machine to build AA reports as long as you have the Sysdata folder shared.
Tuesday, October 25, 2011
Mission Statement
For a while now, I have wanted to do something that is not necessitated because of work or pleasure. I suppose it’s a desire to build something that could be useful to others. I wanted to do something constructive and do it only because I want to and I can. To do something that will be of use to others, I had to work on something that I knew quite a bit about. And that brought me to Dynamics GP. I don’t want to go into my experience and expertise with GP. Suffice to say that it is one of the things that I am really good at.
How to use my knowledge of GP? The simplest choice was to create a blog. And thus was born “Insights of a GP Consultant.” This blog will be my attempt to share my knowledge of GP in way I think that is not being done a lot. There are lot of forums and sites with information on GP. How is this blog going to be different and more importantly, useful?
I am going to follow three simple rules.
Keep it functional (mostly). Most of the existing blogs, forums, or websites are mostly technical even when they pertain to an ERP product like GP. Most people who use GP on a day to day basis are not technical gurus. This blog will be accessible to them. It will mainly address the functional aspects of GP and not get into the technical details. There may be instances when it becomes unavoidable when addressing certain topics, but in general technical details will be kept to a minimum
Keep it simple. This blog is not a white paper or a technical manual. It will be a simple article that addresses one topic in a straight forward and uncomplicated fashion. The language will be simple and the goal will be to breakdown complex information into small easily digestible parts. Screenshots and figures will be used to wherever necessary.
Keep it short. Posts will generally be short. The idea is to be able to read one post in 10 to 15 minutes (with a cup of coffee or a glass of wine) and not be overwhelmed with information. If a topic needs to be longer, then it will be broken into smaller pieces over multiple posts.
My hope is that because of these three reasons, this blog will be more accessible to regular day to day GP users.
Disclaimer: Let me use the disclaimer to give the first piece of advice on using GP. If you are not sure of the results of a particular operation, first try it in a test environment. Then move to production but before running the operation, make a backup (or have someone make it for you). Use this simple rule before trying any of my suggestions. You will not only be saving yourself from a lot of potential trouble but you will be less stressed when you run the process. You might even enjoy it.
With that being said, I would like to welcome you to my blog.
Subscribe to:
Comments (Atom)